About
Piduino Library (libpiduino) is a C++ library that lets you write and compile Arduino programs in the Raspberry Pi. This library targets the BCM283x SoC (System on a Chip), all 54 pins, and not a specific set of pins of any Raspberry Pi (RPi) board.
This library does not support Analog to Digital Conversion (ADC) functions as the BCM283x SoC does not have an integrated ADC and I don’t want to create hardware-dependent software. If you need ADC is recommended to use external libraries.
Finally most of this library code was built so it can be easily ported to another platform like the Artik/Exynos SoCs or Snapdragon SoCs in the future, if you want to port this library to another platform send me an email (jgarzagu@gmail.com).
Install
Open a terminal in your Raspberry Pi board and enter:
sudo apt-get install libpiduino-dev
-> source code <-
or Download and install the debian packages directly.
wget https://github.com/NVSL/PiDuino_Library/releases/download/1.0.0/libpiduino1_1.0-1_armhf.deb
wget https://github.com/NVSL/PiDuino_Library/releases/download/1.0.0/libpiduino-dev_1.0-1_armhf.deb
sudo dpkg -i libpiduino1_1.0-1_armhf.deb
sudo dpkg -i libpiduino-dev_1.0-1_armhf.deb
Setup
To run this library correctly first setup the SPI, I2C and Serial Interfaces. To do this type:
sudo raspi-config
Go to Advanced options.
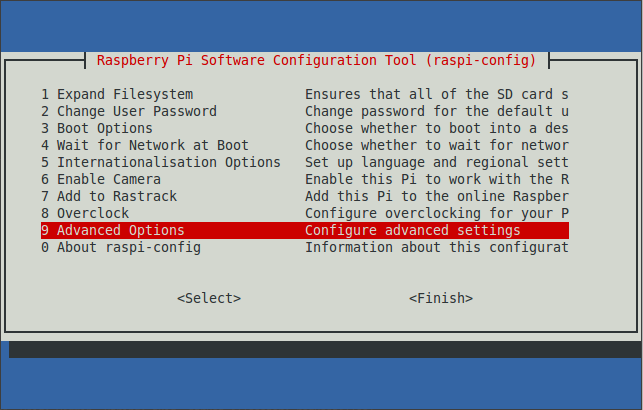
Enable SPI and I2C Interfaces and disable Serial login shell.
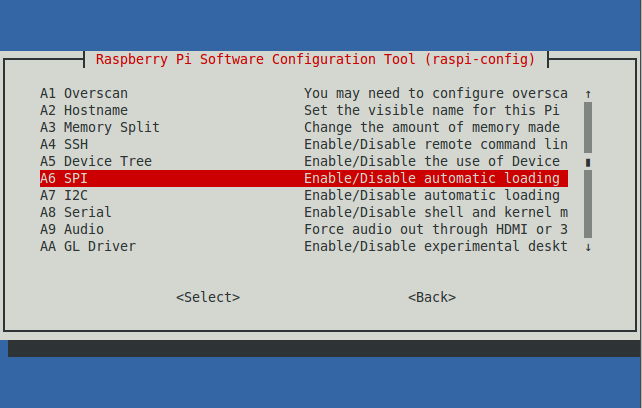
- Enable SPI Interface: YES -> OK -> YES -> OK
- Enable I2C Interface: YES -> OK -> YES -> OK
- Dsiable Serial login shell: NO -> OK
Reboot your system.
Run
Once the setup is complete create a file, lets say test.cpp, and copy the following code:
test.cpp
#include <Arduino.h>

int ledPin = 4; // GPIO4

void setup() {
        pinMode(ledPin, OUTPUT);
}

void loop() {
        printf("LED ON\n");
        digitalWrite(ledPin, HIGH);
        delay(1000);
        printf("LED OFF\n");
        digitalWrite(ledPin, LOW);
        delay(1000);
}
Compile it.
g++ -lpiduino test.cpp -o test
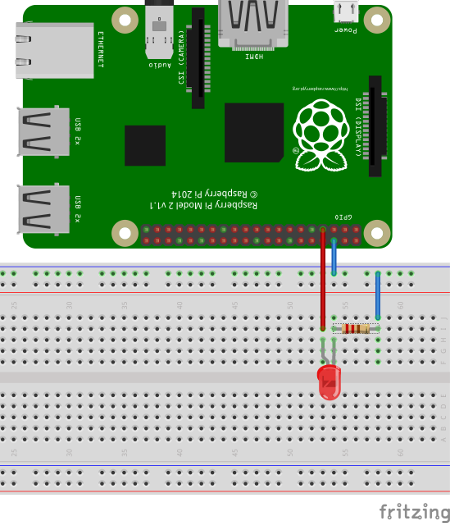
Now connect an LED with its proper resistor (e.g. 220 ohms) to RPi GPIO4. You can check which pin is GPIO4 in your board in the RPi Pinout tab.
Run your program.
./test
Enjoy!!.
See the Reference tab to see all the functions ported.
Optional
- If you want to compile an .ino file you can do it like below and use either g++ or gcc.
g++ -lpiduino -x c++ test.ino -o test
- If you want to include main() in your code you can call “piDuino.h”. piDuino.h has already all the headers of the Piduino library included so you don’t need to include Wire.h or SPI.h like as if you use Arduino.h.
#include "piDuino.h"

int ledPin = 4; // GPIO4

void setup() {
        pinMode(ledPin, OUTPUT);
}

void loop() {
        printf("LED ON\n");
        digitalWrite(ledPin, HIGH);
        delay(1000);
        printf("LED OFF\n");
        digitalWrite(ledPin, LOW);
        delay(1000);
}

int main () {
	setup();
	while(1){
		loop();
	}
	return (0);
}- When the program exits this library will turn off and set as INPUT all pins that were configured using pinMode(pin, mode). This to prevent leaving LEDs or Motors running if a program crashes or not behaves well. If you want to do something at exit or prevent pins to be turned off then you can assign an exit function to the variable ARDUINO_EXIT_FUNC. By adding exit(1) in your exit function the configured pins will not be turned off.
#include "Arduino.h"

// Add an LED to the output pin then run this program
// and enter Ctr-C to see how the LED turns off auto-magically

int GPIO_OUTPUT = 14;

void myExit (void) {
   // Commands to be executed when the program exits.
   printf("My exit commands\n");
   // Uncommenting exit(1) will prevent pins to be turned off at exit.
   // exit(1);

void setup() {
   ARDUINO_EXIT_FUNC = &myExit;
   pinMode(GPIO_OUTPUT, OUTPUT);
   digitalWrite(GPIO_OUTPUT, HIGH);
}

void loop() {
}- If you want to check that the SPI, I2C drivers are enabled use the command below. Note that the I2C number may be different depending on your RPi board version.
ls /dev/ | grep 'i2c-\|spidev\|ttyAMA0'
The output should be something like this:
i2c-1
spidev0.0
spidev0.1
ttyAMA0
Donate
Your donations will help me continue improving this library.

░░░░░░░░░▄░░░░░░░░░░░░░░▄
░░░░░░░░▌▒█░░░░░░░░░░░▄▀▒▌
░░░░░░░░▌▒▒█░░░░░░░░▄▀▒▒▒▐
░░░░░░░▐▄▀▒▒▀▀▀▀▄▄▄▀▒▒▒▒▒▐
░░░░░▄▄▀▒░▒▒▒▒▒▒▒▒▒█▒▒▄█▒▐
░░░▄▀▒▒▒░░░▒▒▒░░░▒▒▒▀██▀▒▌
░░▐▒▒▒▄▄▒▒▒▒░░░▒▒▒▒▒▒▒▀▄▒▒▌
░░▌░░▌█▀▒▒▒▒▒▄▀█▄▒▒▒▒▒▒▒█▒▐
░▐░░░▒▒▒▒▒▒▒▒▌██▀▒▒░░░▒▒▒▀▄▌
░▌░▒▄██▄▒▒▒▒▒▒▒▒▒░░░░░░▒▒▒▒▌
▌▒▀▐▄█▄█▌▄░▀▒▒░░░░░░░░░░▒▒▒▐
▐▒▒▐▀▐▀▒░▄▄▒▄▒▒▒▒▒▒░▒░▒░▒▒▒▒▌
▐▒▒▒▀▀▄▄▒▒▒▄▒▒▒▒▒▒▒▒░▒░▒░▒▒▐
░▌▒▒▒▒▒▒▀▀▀▒▒▒▒▒▒░▒░▒░▒░▒▒▒▌
░▐▒▒▒▒▒▒▒▒▒▒▒▒▒▒░▒░▒░▒▒▄▒▒▐
░░▀▄▒▒▒▒▒▒▒▒▒▒▒░▒░▒░▒▄▒▒▒▒▌
░░░░▀▄▒▒▒▒▒▒▒▒▒▒▄▄▄▀▒▒▒▒▄▀
░░░░░░▀▄▄▄▄▄▄▀▀▀▒▒▒▒▒▄▄▀
░░░░░░░░░▒▒▒▒▒▒▒▒▒▒▀
Thank you!.
By Jorge Garza , Updated on: